Project 23 Someone Comes
1.Overview
You may see such a lens in a film or television. When someone wants to attack a target, but not close to the target, they were directly found and the alarm sounded. When some special forces go to the target, they will be covered with moist mud, so that they will not be discovered by the other party. Why ?
Originally, the human body will emit a certain wavelength of infrared rays of about 10um. The relevant sensors are installed near the targets that are being attacked to sense the infrared rays emitted by the human body and then alarm. After the mud is applied, the sensors can not sense the infrared rays emitted by the human body.
In this project, you will learn how to use a PIR motion sensor and micro:bit to detect whether there is someone move nearby. Finally show the different images on 25 LED matrix of micro:bit.
2.Components Required
Micro:bit main board*1
Keyestudio Edge Connector IO Breakout Board for Micro:bit *1
USB Cable*1
Keyestudio PIR Motion Sensor*1
Keyestudio Digital Buzzer Module*1
Alligator Clip Wire*6
3.Component Introduction
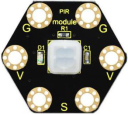
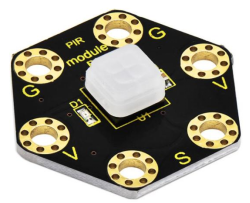
About keyestudio micro bit honeycomb PIR Motion Sensor:
This keyestudio PIR motion module is fully compatible with micro:bit control board.When using, connect the module to micro:bit control board using Crocodile clip line.
It is mainly composed of a digital pyroelectric infrared sensor, which is a digital signal output device.
This sensor has built-in filters, strong anti-interference, low voltage and micro power consumption.
The detection distance of the module is 3-5 meters.
The detection angle in the horizontal direction is less than 80°; the detection angle in the vertical direction is less than 55°
There are total 6 rings on the module. Note that two G rings, two V rings and two S rings are separately connected. G for ground; V for 3V; S for signal pin(0 1 2).
Once detecting someone moving nearby, the signal pin of micro:bit main board will input HIGH level; LED on the module lights.
4.Technical Parameters
Working voltage: DC 3.0-3.3V
Working current: 100mA
Maximum power: 0.5W
Output signal: digital signal
Detection distance: 3-5 meters
Detection angle: less than 80°in the horizontal direction and less than 55° in the vertical direction
Operating temperature range: -30℃~ +80℃
Dimensions: 31mm*27mm*6mm
Weight: 2g
Environmental attributes: ROHS
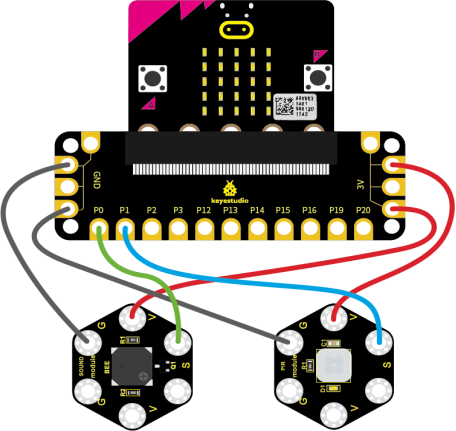
5.Connection Diagram
Attach the main board to Keyestudio Edge Connector IO Breakout Board for Micro:bit;
Connect the keyestudio micro bit honeycomb PIR motion sensor to the shield with 3 Alligator clip cables;
Ring S to P1, V to 3V, and G to GND.
Connect the keyestudio micro bit passive buzzer to the shield with 3 Alligator clip cables.
Ring S to P0, V to 3V, and G to GND.
Interface the micro:bit to your computer with a micro USB cable.
6.Coding
So now let’s move to coding. Below are some steps to follow.
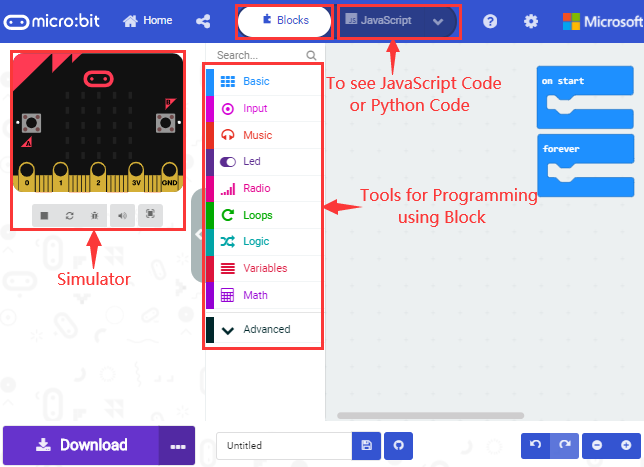
Open the https://makecode.micro:bit.org/#editor to write your code.
Microsoft MakeCode is actually a platform that allows us to code for a micro:bit, and also provides an interactive simulator where we can debug and run our code, and will be able to see what to expect out right there on the site.
Go to MakeCode and choose My Projects and click on New Projects.
If you want to see the codes behind, then you can click on JavaScript and it will display JavaScript code there in IDE.
7.The following code is for your reference
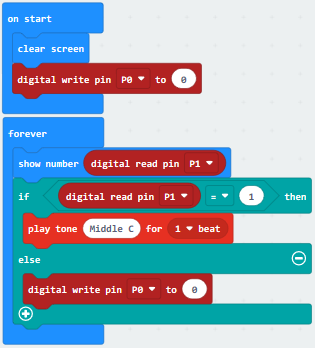
8.Test Results
Wire according to connection diagram and upload the test code to the main board.
When the PIR motion sensor detects movement of human , the LED dot matrix shows High Level(1) and the passive buzzer make noises; otherwise, the matrix displays Low Level(0) and the buzzer makes no sound.