Progetto 16 Timebomb
1. Descrizione
Questo progetto ti offrirà l’opportunità di sperimentare un interessante gioco della bomba a tempo.
In questo progetto, la matrice di punti rappresenta la tua bomba a tempo, mentre il tubo digitale mostra il tempo rimanente. I pulsanti non solo controllano la bomba ma permettono anche di impostarne il tempo. Puoi impostare un conto alla rovescia per controllare questa bomba, che esplode quando il conto alla rovescia termina. Inoltre, viene utilizzato un buzzer per l’allarme.
In ogni caso, programmando su più sensori, la tua capacità complessiva di pensiero logico può essere migliorata.
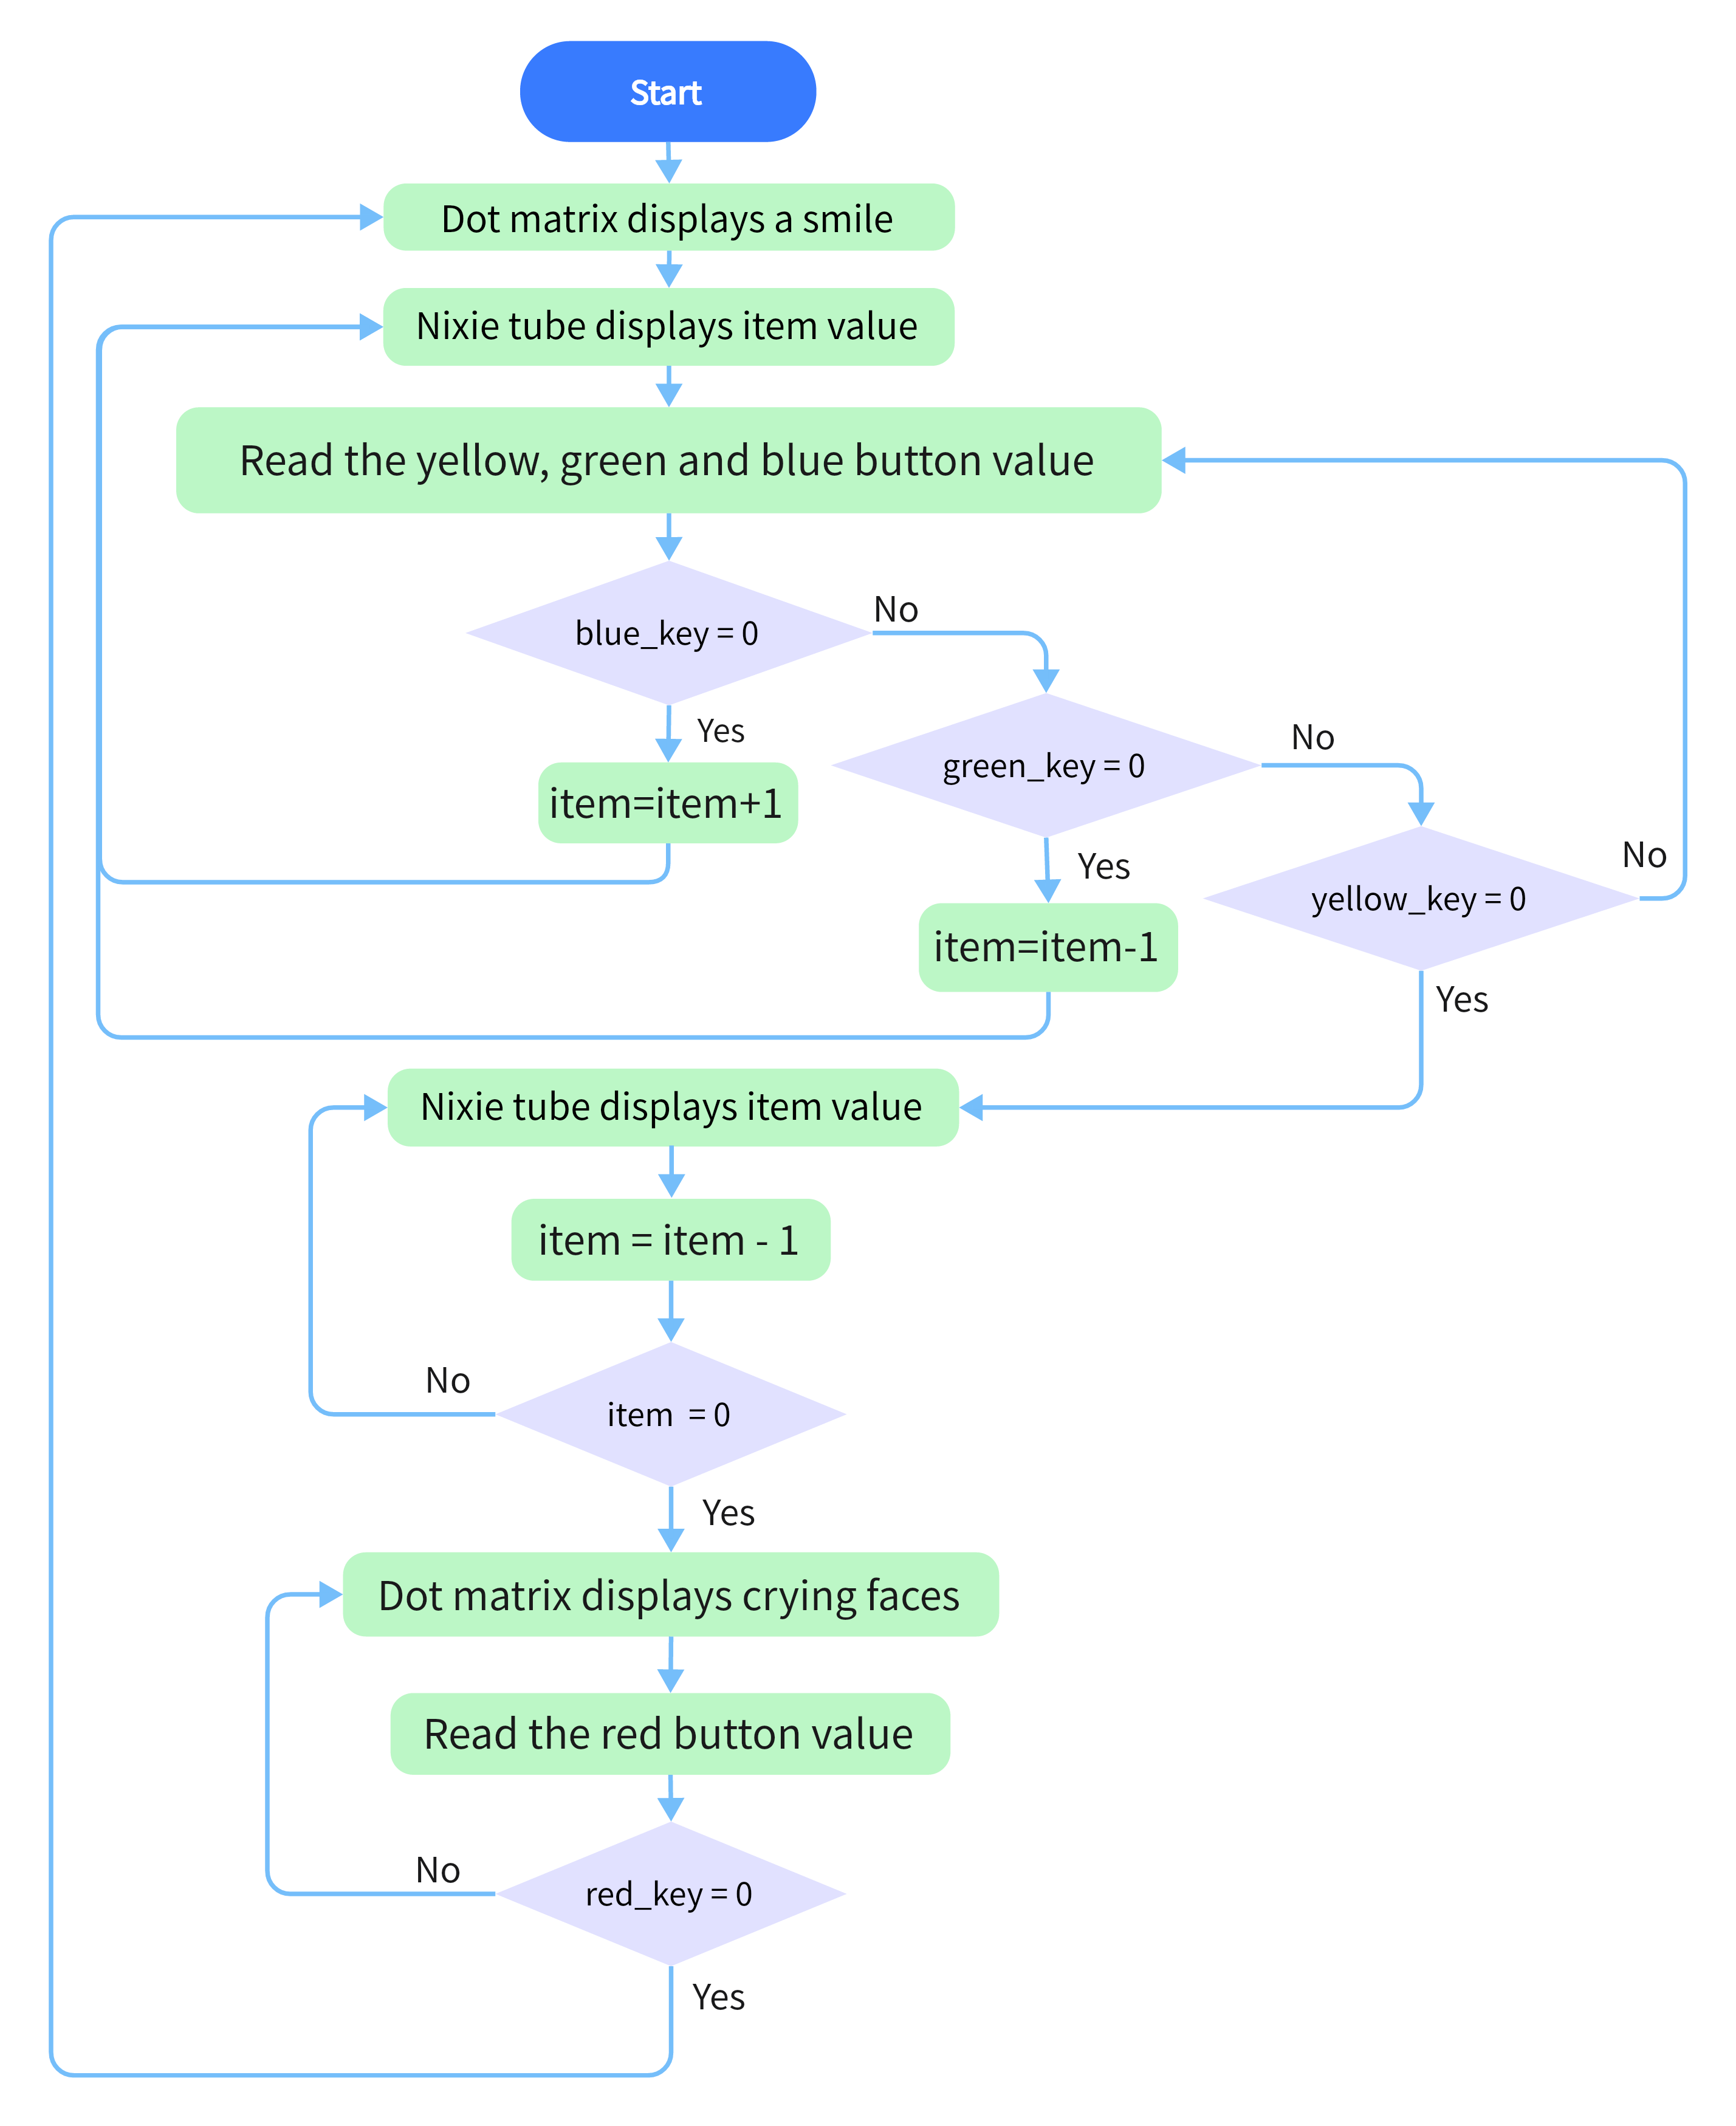
2. Diagramma di flusso
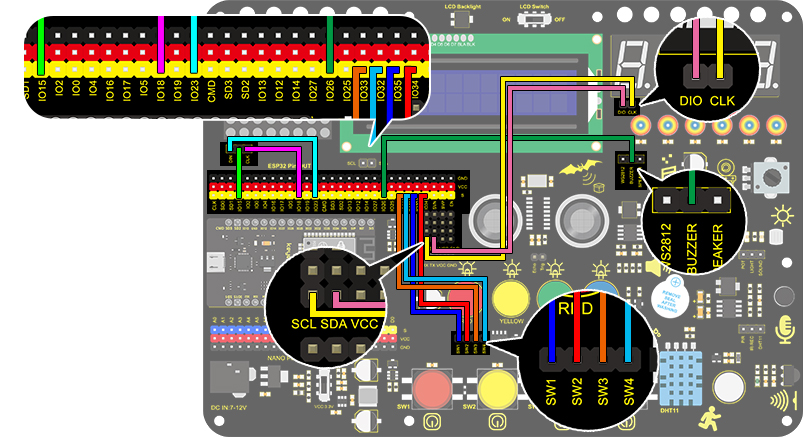
3. Schema di collegamento
4. Codice di test
/*
  keyestudio ESP32 Inventor Learning Kit
  Project 16 Timebomb
  http://www.keyestudio.com
*/
#include "TM1650.h" //Upload TM1650 libraries
#include "LedControl.h"
//Dot matrix
int DIN = 23;
int CLK = 18;
int CS = 15;
LedControl lc=LedControl(DIN,CLK,CS,1);

byte smile[8]=   {0x20,0x44,0x22,0x02,0x02,0x22,0x44,0x20};//Smile face
byte weep[8]= {0x20,0x42,0x24,0x04,0x04,0x24,0x42,0x20};//Crying face

// Button, buzzer and digital tube
int item = 0; //displayed value
TM1650 DigitalTube(22,21);   //Set the SCL pin of the digital tube to 22 and the DIO pin to 21

int addition = 32;		//Set the plus button to IO32
int subtraction = 33;	//Set the minus button to IO33
int start = 34;			//Set the start button to IO34
int reset = 35;			//Set the reset button to IO35
int buzz = 26;			//Set the buzzer to IO26

int buzz_val = 1;		//The variable of buzzer

void printByte(byte character [])  //The dot matrix display function
{
  int i = 0;
  for(i=0;i<8;i++)
  {
    lc.setRow(0,i,character[i]);
  }
}

void setup()
{
  lc.shutdown(0,false);       //MAX72XX is in power saving mode when starting
  lc.setIntensity(0,8);       //Set the brightness to the maximum
  lc.clearDisplay(0);         //Clear the display
 //Set the pin mode
  pinMode(addition,INPUT);
  pinMode(subtraction,INPUT);
  pinMode(start,INPUT);
  pinMode(reset,INPUT);
  pinMode(buzz,OUTPUT);

  for(char b=0;b<4;b++)
  {
    DigitalTube.clearBit(b);      //DigitalTube.clearBit(0 to 3); Clear bit display.
  }
}

void loop()
{
  printByte(smile);		//Dot matrix displays a smile face
  DigitalTube.displayFloatNum(item); //Digital tube displays the item value
  int blue_key = digitalRead(addition);		//Read the button value
  int green_key = digitalRead(subtraction);
  int yellow_key = digitalRead(start);
  if(blue_key == 0)
  {	//Determine whether the button is pressed
    item = item + 1;  	//+1
    delay(200);
  }
  if(green_key == 0 )
  {
    item = item - 1;  //-1
    delay(200);
  }
  if (item > 9999)
  {  //When the value is greater than 9999(exceeding the display range), reset
    item = 0;
  }
  if(yellow_key == 0)
  {
    while(1)
    {					//whlie()loop
      DigitalTube.displayFloatNum(item); //Digital tube displays the item value
      item--;					//item--equals to item = item - 1
      delay(1000);
      buzz_val = !buzz_val;		//“!”takes the inverse runner. invert buzz_val
      digitalWrite(buzz,buzz_val);
      if(item == 0)
      {
        digitalWrite(buzz,LOW);
        break;					//break to exit the loop
      }
    }
    while(item==0)
    {				//when itme=0, enter loop
      DigitalTube.displayFloatNum(item); //Digital tube displays the item value
      printByte(weep);					//Display a crying face
      int red_key = digitalRead(reset);
      if(red_key == 0)
      {
        break;
      }
    }
  }
}
5. Risultato del test
Dopo aver collegato i fili e caricato il codice, il pulsante blu (aumento) e il pulsante verde (diminuzione) possono essere utilizzati per impostare il tempo, mentre il pulsante giallo può essere usato per avviare il conto alla rovescia. Quando il conto alla rovescia termina, la faccina sorridente sul display a matrice di punti si trasforma in una faccia che piange, simulando l’esplosione della bomba. Premendo il pulsante rosso è possibile resettare il programma.