Progetto 5 Luce Ambientale Arcobaleno
1. Descrizione
Il LED Arduino 2812RGB è una luce programmabile colorata e suggestiva, il cui colore, luminosità e ritmo sono regolabili. Questa luce ambientale arcobaleno può essere utilizzata come decorazione dinamica a piacere. Oppure può essere controllata per “danzare con la musica”. Importante, può essere migliorata come allarme. Il suo sensore integrato rileva l’ambiente circostante per avvisare gli utenti cambiando colore, luminosità e ritmo.
2. Principio di Funzionamento

Il protocollo dati adotta una modalità di comunicazione a codice single-line return-to-zero. Dopo il reset del pixel all’accensione, il terminale DIN riceve i dati dal controller. I primi 24 bit di dati in arrivo vengono estratti dal primo pixel e inviati al registro dati interno.
I dati rimanenti vengono amplificati da un circuito di amplificazione e trasmessi tramite la porta DOUT al pixel successivo in cascata. Durante la trasmissione attraverso i pixel, il segnale diminuisce di 24 bit ogni volta.
Inoltre, il pixel adotta una tecnologia di rimodellamento e inoltro automatico, per cui il numero di pixel in cascata è limitato solo dalla velocità di trasmissione del segnale.
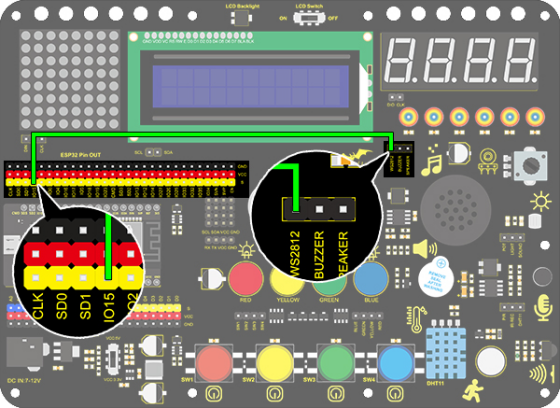
3. Schema di Collegamento
4. Codice di Test
/*
  keyestudio ESP32 Inventor Learning Kit
  Project 5.1  Rainbow Ambient Light
  http://www.keyestudio.com
*/
//Add 2812RGB library file
#include <NeoPixel_ESP32.h>
#define PIN 15

Adafruit_NeoPixel strip = Adafruit_NeoPixel(6, PIN);  //Defines the instance strip and assigns the RGB LED number pins to the library code

void setup()
{
  strip.begin();        //Activate RGB LED
  strip.show(); // Refresh the display
}

void loop()
{
  strip.setPixelColor(0, strip.Color(255, 0, 0));       //The frist RGB LED is red
  strip.setPixelColor(1, strip.Color(0, 255, 0));       //The second RGB LED is green
  strip.setPixelColor(2, strip.Color(0, 0, 255));       //The third RGB LED is blue
  strip.setPixelColor(3, strip.Color(255, 255, 0));     //The fourth RGB LED is yellow
  strip.setPixelColor(4, strip.Color(255, 0, 255));     //The fifth RGB LED is purple
  strip.setPixelColor(5, strip.Color(255, 255, 255));   //The sixth RGB LED is white
  strip.show();       //Refresh the display
  delay(100);         //Give a delay to save the stability of the display
}
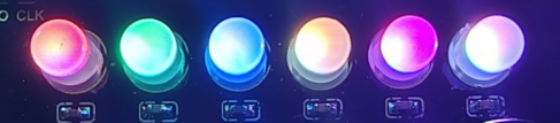
5. Risultato del Test
Dopo aver caricato il codice e acceso l’alimentazione, il LED si illuminerà con colori diversi.
Da sinistra a destra:
Il primo LED RGB è rosso
Il secondo LED RGB è verde
Il terzo LED RGB è blu
Il quarto LED RGB è giallo
Il quinto LED RGB è viola
Il sesto LED RGB è bianco
6. Codice Esteso
/*
  keyestudio ESP32 Inventor Learning Kit
  Project 5.2  Rainbow Ambient Light
  http://www.keyestudio.com
*/
//Add 2812RGB library file
#include <NeoPixel_ESP32.h>
#define PIN 15
Adafruit_NeoPixel strip = Adafruit_NeoPixel(6, PIN, NEO_GRB + NEO_KHZ800);

void setup()
{
  strip.begin();
  strip.show(); // Initialize all pixels to 'off'
}

void loop()
{
  // Some example procedures showing how to display to the pixels:
  colorWipe(strip.Color(255, 0, 0), 50); // Red
  colorWipe(strip.Color(0, 255, 0), 50); // Green
  colorWipe(strip.Color(0, 0, 255), 50); // Blue
  // Send a theater pixel chase in...
  theaterChase(strip.Color(127, 127, 127), 50); // White
  theaterChase(strip.Color(127,   0,   0), 50); // Red
  theaterChase(strip.Color(  0,   0, 127), 50); // Blue

  rainbow(20);
  rainbowCycle(20);
  theaterChaseRainbow(50);
}

// Fill the dots one after the other with a color
void colorWipe(uint32_t c, uint8_t wait)
{
  for(uint16_t i=0; i<strip.numPixels(); i++)
  {
      strip.setPixelColor(i, c);
      strip.show();
      delay(wait);
  }
}

void rainbow(uint8_t wait)
{
  uint16_t i, j;

  for(j=0; j<256; j++)
  {
    for(i=0; i<strip.numPixels(); i++)
    {
      strip.setPixelColor(i, Wheel((i+j) & 255));
    }
    strip.show();
    delay(wait);
  }
}

// Slightly different, this makes the rainbow equally distributed throughout
void rainbowCycle(uint8_t wait)
{
  uint16_t i, j;
  for(j=0; j<256*5; j++) // 5 cycles of all colors on wheel
  {
    for(i=0; i< strip.numPixels(); i++)
    {
      strip.setPixelColor(i, Wheel(((i * 256 / strip.numPixels()) + j) & 255));
    }
    strip.show();
    delay(wait);
  }
}

//Theatre-style crawling lights.
void theaterChase(uint32_t c, uint8_t wait)
{
  for (int j=0; j<10; j++) //do 10 cycles of chasing
  {
    for (int q=0; q < 3; q++)
    {
      for (int i=0; i < strip.numPixels(); i=i+3)
      {
        strip.setPixelColor(i+q, c);    //turn every third pixel on
      }
      strip.show();
      delay(wait);
      for (int i=0; i < strip.numPixels(); i=i+3)
      {
        strip.setPixelColor(i+q, 0);        //turn every third pixel off
      }
    }
  }
}

//Theatre-style crawling lights with rainbow effect
void theaterChaseRainbow(uint8_t wait)
{
  for (int j=0; j < 256; j++) // cycle all 256 colors in the wheel
  {
    for (int q=0; q < 3; q++)
    {
        for (int i=0; i < strip.numPixels(); i=i+3)
        {
          strip.setPixelColor(i+q, Wheel( (i+j) % 255));    //turn every third pixel on
        }
        strip.show();
        delay(wait);
        for (int i=0; i < strip.numPixels(); i=i+3)
        {
          strip.setPixelColor(i+q, 0);        //turn every third pixel off
        }
    }
  }
}

// Input a value 0 to 255 to get a color value.
// The colours are a transition r - g - b - back to r.
uint32_t Wheel(byte WheelPos)
{
  if(WheelPos < 85)
  {
  	return strip.Color(WheelPos * 3, 255 - WheelPos * 3, 0);
  }
  else if(WheelPos < 170)
  {
      WheelPos -= 85;
      return strip.Color(255 - WheelPos * 3, 0, WheelPos * 3);
  }
  else
  {
      WheelPos -= 170;
      return strip.Color(0, WheelPos * 3, 255 - WheelPos * 3);
  }
}
7. Risultato del Test
Dopo aver caricato il codice e acceso l’alimentazione, il LED si illuminerà con colori diversi e realizzerà uno spettacolo di luci.