Progetto 18 Cuore Pulsante
1. Descrizione
In questo progetto, un cuore pulsante sarà mostrato tramite una scheda Arduino, un display a matrice di punti 8X8, una scheda circuito e alcuni componenti elettronici. Attraverso la programmazione, è possibile controllare la frequenza del battito, la dimensione del cuore e la sua luminosità.
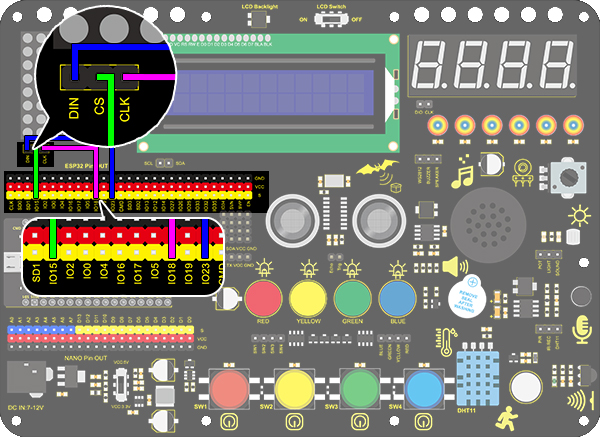
2. Schema di Collegamento
3. Codice di Test
/*
  keyestudio ESP32 Inventor Learning Kit
  Project 18 Beating Heart
  http://www.keyestudio.com
*/

#include "LedControl.h"
int DIN = 23;
int CLK = 18;
int CS = 15;
LedControl lc=LedControl(DIN,CLK,CS,1);
const byte IMAGES1[] = {0x30, 0x78, 0x7c, 0x3e, 0x3e, 0x7c, 0x78, 0x30};  // a big heart
const byte IMAGES2[] = {0x00, 0x10, 0x38, 0x1c, 0x1c, 0x38, 0x10, 0x00};  //a small heart

void setup()
{
  lc.shutdown(0,false);
  // Set brightness to a medium value
  lc.setIntensity(0,8);
  // Clear the display
  lc.clearDisplay(0);
}

void loop()
{
  for(int i=0; i < 8; i++)
  {
      lc.setRow(0,i,IMAGES1[i]);
  }
  delay(1000);
  for(int i=0; i < 8; i++)
  {
    lc.setRow(0,i,IMAGES2[i]);
  }
  delay(1000);
}
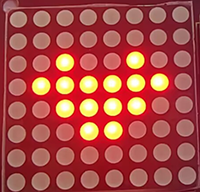
4. Risultato del Test
Dopo aver collegato i fili e caricato il codice, le due dimensioni del cuore vengono visualizzate alternativamente.