Progetto 34 Casa Intelligente
1. Descrizione
In questo progetto, simuliamo la casa intelligente con il kit inventore.
Note
Devi preparare una rete WIFI a frequenza 2.4GHz, non a 5GHz. Può essere un hotspot mobile o un router.
La scheda ESP32 consuma più energia quando è connessa alla rete, quindi è necessario collegare un’alimentazione esterna a questo kit. Forniamo un portabatterie 6XAA (batterie non incluse), che puoi collegare alla porta DC della scheda integrata ESP32.


Quando usi altri dispositivi per controllare questo kit, la scheda ESP32 deve essere connessa alla stessa rete del dispositivo di controllo.
Ricorda il nome e la password della tua rete wifi e inseriscili nel codice prima di caricarlo.
const char* ssid = "your_SSID"; // Inserisci il nome WiFi, ad esempio,= "KEYES"
const char* password = "your_password"; // Inserisci la password WiFi, ad esempio,= "123456"
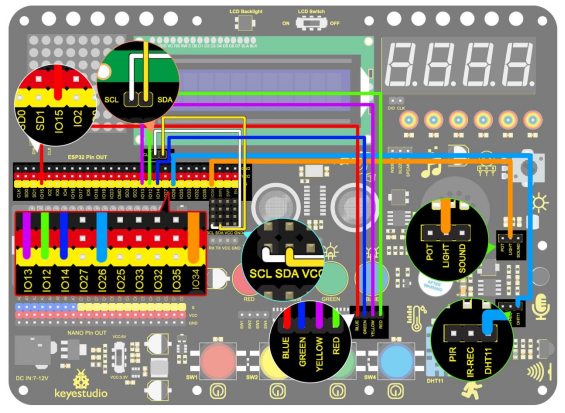
2. Schema di Collegamento
3. Caricamento del Codice
#include <WiFi.h>
#include <ESPAsyncWebServer.h>
#include <xht11.h>
#include <LiquidCrystal_I2C.h>
LiquidCrystal_I2C lcd(0x27, 16, 2);
// Configurazione WiFi
const char* ssid = "your-SSID"; // nome WiFi
const char* password = "your-PASSWORD"; // password WiFi
// Configurazione DHT11
xht11 xht(26); // imposta il pin del sensore DHT11 su IO26
unsigned char dat[] = { 0, 0, 0, 0 }; // Definisce un array per memorizzare i valori di temperatura e umidità
int i = 0;
// pin analogico fotoresistore
#define LDR_PIN 34 // collega il fotoresistore a GPIO 34
// pin LED
#define redLED_PIN 12
#define yellowLED_PIN 13
#define greenLED_PIN 14
#define blueLED_PIN 15
// stato LED
bool redLEDState = false;
bool yellowLEDState = false;
bool greenLEDState = false;
bool blueLEDState = false;
// Server Web
AsyncWebServer server(80);
String generateHTML() {
String html = "<html><head><style>";
// formato base
html += "body { font-family: Arial, sans-serif; background-color: #f4f4f4; }";
html += "h2 { color: #333; }";
html += "div.sensor { background-color: #fff; padding: 20px; margin: 15px; border-radius: 10px; box-shadow: 0px 4px 6px rgba(0, 0, 0, 0.1); }";
html += "div.sensor h3 { margin: 0; }";
html += "div.sensor p { font-size: 20px; color: #555; }";
// formato pulsanti
html += "button { font-size: 30px; padding: 15px; margin: 10px; border: none; cursor: pointer; width: 200px; height: 100px; }";
html += "button.on { background-color: #4CAF50; color: white; }"; // colore LED acceso
html += "button.off { background-color: #f44336; color: white; }"; // colore LED spento
html += "</style>";
html += "<meta http-equiv='refresh' content='5'>"; // Aggiornamento automatico ogni 5 secondi
html += "</head><body>";
// temperatura
html += "<h2>Dati Sensore</h2>";
html += "<div class='sensor'>";
html += "<h3>Temperatura</h3>";
html += "<p>" + String(dat[2]) + " °C</p>";
html += "</div>";
// umidità
html += "<div class='sensor'>";
html += "<h3>Umidità</h3>";
html += "<p>" + String(dat[0]) + " %</p>";
html += "</div>";
// visualizza valore di resistenza del fotoresistore
int lightValue = analogRead(LDR_PIN); // valore fotoresistore
html += "<div class='sensor'>";
html += "<h3>Luminosità</h3>";
html += "<p>" + String(lightValue) + "</p>";
html += "</div>";
// pulsanti di controllo LED
html += "<h2>Controllo LED</h2>";
html += "<button id='btn0' class='" + String(redLEDState ? "on" : "off") + "' onclick='toggleLed(0)'>LED Rosso</button>";
html += "<button id='btn1' class='" + String(yellowLEDState ? "on" : "off") + "' onclick='toggleLed(1)'>LED Giallo</button>";
html += "<button id='btn2' class='" + String(greenLEDState ? "on" : "off") + "' onclick='toggleLed(2)'>LED Verde</button>";
html += "<button id='btn3' class='" + String(blueLEDState ? "on" : "off") + "' onclick='toggleLed(3)'>LED Blu</button>";
// JavaScript per controllo accensione/spegnimento LED
html += "<script>";
html += "function toggleLed(led) {";
html += " var xhr = new XMLHttpRequest();";
html += " xhr.open('GET', '/toggle?led=' + led, true);";
html += " xhr.send();";
html += " var button = document.getElementById('btn' + led);";
html += " if (button.classList.contains('off')) {";
html += " button.classList.remove('off');";
html += " button.classList.add('on');";
html += " } else {";
html += " button.classList.remove('on');";
html += " button.classList.add('off');";
html += " }";
html += "}";
html += "</script>";
html += "</body></html>";
return html;
}
void setup()
{
// Inizializza porta seriale
Serial.begin(115200);
lcd.init(); // inizializza lcd
lcd.backlight();
lcd.setCursor(0, 0);
lcd.print("IP:");
// Connessione WiFi
WiFi.begin(ssid, password);
while (WiFi.status() != WL_CONNECTED) {
lcd.setCursor(i, 1);
lcd.print(".");
delay(500);
i++;
if (i > 15) {
i = 0;
lcd.setCursor(0, 1);
lcd.print(" ");
}
}
lcd.setCursor(0, 1);
lcd.print(" ");
lcd.setCursor(0, 1);
lcd.print(WiFi.localIP());
// Imposta i pin LED come output
pinMode(redLED_PIN, OUTPUT);
pinMode(yellowLED_PIN, OUTPUT);
pinMode(greenLED_PIN, OUTPUT);
pinMode(blueLED_PIN, OUTPUT);
// Gestione richieste Web
server.on("/", HTTP_GET, [](AsyncWebServerRequest* request) {
if (!xht.receive(dat)) {
Serial.println("errore sensore");
}
String html = generateHTML();
request->send(200, "text/html", html);
});
// Controllo accensione LED
server.on("/toggle", HTTP_GET, [](AsyncWebServerRequest* request) {
String led = request->getParam("led")->value();
int ledNum = led.toInt();
if (ledNum == 0) {
redLEDState = !redLEDState;
digitalWrite(redLED_PIN, redLEDState ? HIGH : LOW); // LED 1
} else if (ledNum == 1) {
yellowLEDState = !yellowLEDState;
digitalWrite(yellowLED_PIN, yellowLEDState ? HIGH : LOW); // LED 2
} else if (ledNum == 2) {
greenLEDState = !greenLEDState;
digitalWrite(greenLED_PIN, greenLEDState ? HIGH : LOW); // LED 3
} else if (ledNum == 3) {
blueLEDState = !blueLEDState;
digitalWrite(blueLED_PIN, blueLEDState ? HIGH : LOW); // LED 4
}
request->redirect("/"); // Torna alla pagina principale
});
// Avvia il server Web
server.begin();
}
void loop()
{
// Legge i valori di temperatura e umidità e aggiorna la pagina web
if (!xht.receive(dat))
{
Serial.println("errore sensore");
}
delay(2000); // Aggiorna la pagina ogni 2 secondi
}
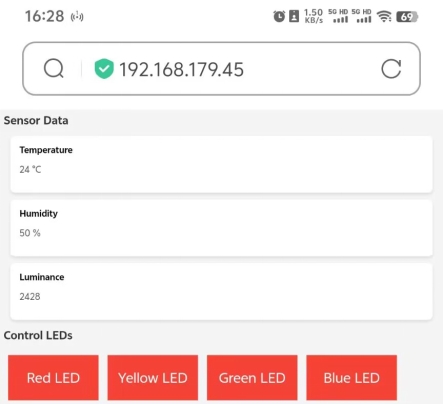
4. Risultato del Test
Dopo aver caricato il codice, LCD1602 mostra l’indirizzo IP. Apri il browser, inserisci l’indirizzo IP e vedrai la pagina di controllo.
A questo punto, puoi usare il dispositivo di controllo per leggere i valori rilevati dal sensore e puoi anche controllare l’accensione e lo spegnimento dei LED.