Progetto 23 Smart Cup
1. Descrizione
In questo progetto, utilizziamo principalmente la scheda di sviluppo Arduino per creare una smart cup programmabile, che indica la temperatura del liquido interno tramite un indicatore RGB. È possibile controllare la luminosità della luce impostando una soglia di temperatura. Se la soglia viene superata, la luce si illumina di più. Altrimenti, si attenua.
La smart cup aiuta gli utenti a controllare meglio la temperatura dell’acqua da bere e a prevenire efficacemente il surriscaldamento o il congelamento.
2. Principio di funzionamento
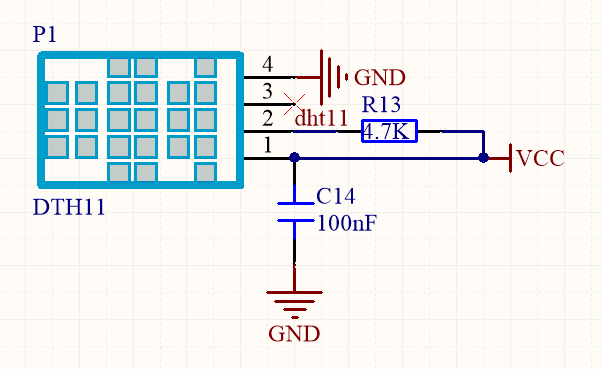
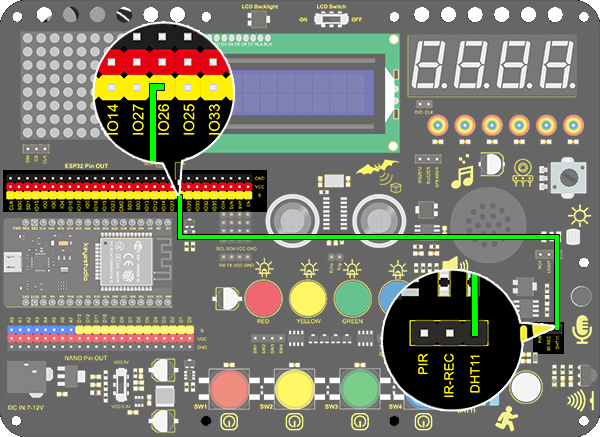
3. Schema di collegamento
4. Codice di test
/*
  keyestudio ESP32 Inventor Learning Kit
  Project 23.1 Smart Cup
  http://www.keyestudio.com
*/
#include <xht11.h>
xht11 xht(26);   //The DHT11 sensor connects to IO26
unsigned char dat[] = {0,0,0,0}; //Define an array to store temperature and humidity data

void setup()
{
  // put your setup code here, to run once:
  Serial.begin(9600);
}

void loop()
{
  // put your main code here, to run repeatedly:
  if (xht.receive(dat)) { //Check correct return to true
    Serial.print("RH:");
    Serial.print(dat[0]); //The integral part of humidity,dht[1] is the decimal part
    Serial.print("%  ");
    Serial.print("Temp:");
    Serial.print(dat[2]); //The integer part of the temperature,dht[3] is the decimal part
    Serial.println("C");
  }
  else
  {    //Read error
    Serial.println("sensor error");
  }
  delay(1500);  //Delay 1500ms
}
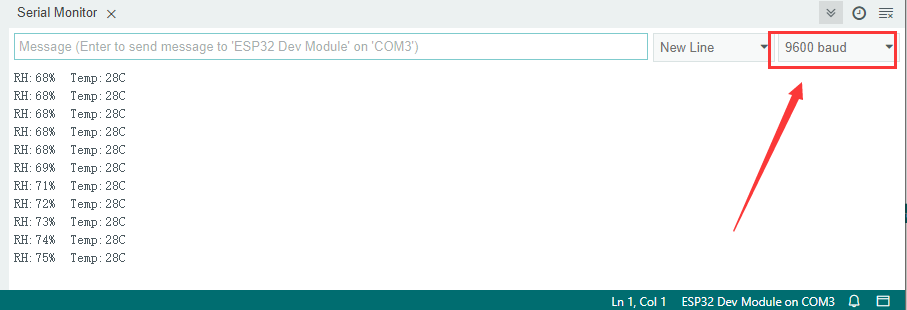
5. Risultato del test
Dopo aver collegato i cavi e caricato il codice, aprire il monitor seriale impostando la velocità a 9600 baud, e verranno visualizzati i valori di temperatura e umidità.
6. Approfondimento
Ora realizzeremo una smart cup che può mostrare la temperatura del liquido. Dividiamo 100 in quattro parti con un LED, come mostrato di seguito:
LED Rosso: 100-75°C
LED Giallo: 75-50°C
LED Verde: 50-25°C
LED Blu: 25-0°C
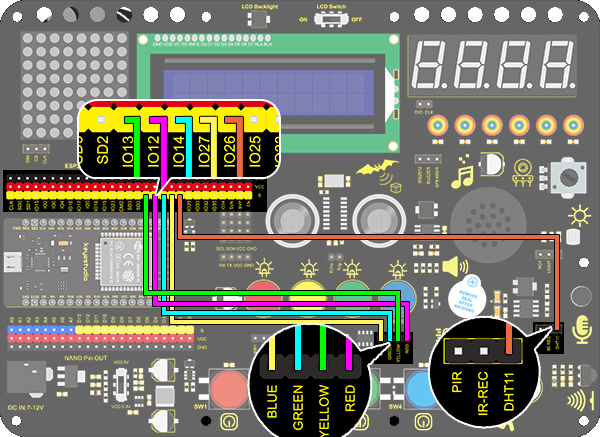
Schema di collegamento:
Codice:
/*
  keyestudio ESP32 ESP32 Inventor Learning Kit
  Project 23.2 Smart Cup
  http://www.keyestudio.com
*/
#include <xht11.h>
xht11 xht(26);                         //Define DHT11 to pin IO26
unsigned char dat[4] = { 0, 0, 0, 0 };  //Define an array to store temperature and humidity data

int red_led = 12;
int yellow_led = 13;   //Define yellow_led to io13
int green_led = 14;    //Define green_led to io14
int blue_led = 27;     //Define blue_led to io27
int temperature = 0;  //Set an variable to save the temperature value

void setup()
{
  // put your setup code here, to run once:
  pinMode(red_led, OUTPUT);     //Set io12 to ouput
  pinMode(green_led, OUTPUT);   //Set io13 to ouput
  pinMode(blue_led, OUTPUT);    //Set io14 to ouput
  pinMode(yellow_led, OUTPUT);  //Set io27 to ouput
  Serial.begin(9600);
}

void loop()
{
  // put your main code here, to run repeatedly:
  if (xht.receive(dat))  //Check correct return to true
  {
    temperature = dat[2];
    if (temperature > 75) // Determine whether value is greater than 75
    {
      digitalWrite(green_led, LOW);
      digitalWrite(red_led, HIGH);
      digitalWrite(blue_led, LOW);
      digitalWrite(yellow_led,LOW);
    }
    if (temperature < 75 && temperature > 50) //Determine whether value is between 50 and 75
    {
      digitalWrite(green_led, LOW);
      digitalWrite(red_led, LOW);
      digitalWrite(blue_led, LOW);
      digitalWrite(yellow_led,HIGH);
    }
    if (temperature < 50 && temperature > 25) //Determine whether value is between 25 and 50
    {
      digitalWrite(green_led, HIGH);
      digitalWrite(red_led, LOW);
      digitalWrite(blue_led, LOW);
      digitalWrite(yellow_led,LOW);
    }
    if (temperature < 25)  //Determine whether value is smaller than 25
    {
      digitalWrite(green_led, LOW);
      digitalWrite(red_led, LOW);
      digitalWrite(blue_led, HIGH);
      digitalWrite(yellow_led,LOW);
    }
  }
  delay(1500);  //Delay 1500ms
}
Risultato del test
LED Rosso: 100-75°C
LED Giallo: 75-50°C
LED Verde: 50-25°C
LED Blu: 25-0°C
Se il LED blu è acceso, significa che la temperatura rilevata dal sensore DHT11 è nell’intervallo 0-25°.